I've heard about the word 'Inchies' but couldnt work my head around it.How could someone possibly work on such a small surface, I wondered?! I know that ATCs are small too but at least they are big enough to add a few bits and pieces. Anyway I got some inchies and was trying to figure out how to use it, what to make of it.
For a first time I wanted to use them as a frame or something. I started by painting four of them using Reeves acrylic paint in yellow as shown in step 1. Let it dry for a few minutes.It wont take long as acrylic paints dry very fast. Then I've inked up one of my favourite stamps by Crafty individuals (CI - 113) with brilliance black ink and stamped the four squares by putting them together as shown in step 2.
Step 1:

Step 2:

This is a closed up view of the inked inchies....you can see that the surface is not very smooth as I intentionally left the marks of the brushstrokes while painting it.

Then I have used whispers brush markers to colour in the flowers as shown in step 3.
Step 3:

And finally I decided I wanted a smooth finish afterall....So I decided to use amazing glace to emboss them. I first inked them with clear embossing ink, then sprinkled with amazing glaze, tapped off the excess and heat emboss with a heat gun.
Step 4:

Step 5:

I was quite pleased with the result, and I thought I would use it as an embellishment on a card.
I have first used the same stamp and inked the background of my card with versamark. I then chalked over it using yellow , red and orange colour. I have inserted some eyelets in the inchies and thread through black satin ribbon to interlink the inchies. I mounted the inchies on a piece of orange colour card to make the blackc ribbon stand out, then mounted this onto black card which has been finally mounted onto the same orange colour card. I stamped with black brilliance ink part of the same stamp, colour it in with whispers brush markers and cut it into a square which has been mounted onto orange card, then black card. I then glued down the same satin ribbon to run across the card, glued down my inchies embellishment and the stamped image.I finished off with a good luck peel offs.And the result is this:


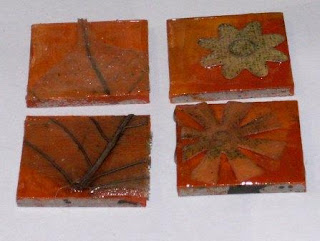
I have had so much fun that I decided to try another technique with the inchies. I wanted to try to embed some elements with amazing glaze, so I decided to have a go with the inchies.
Step 1:
I have prepared the inchies as mentioned above by painting with acrylic paints but this time I have used yellow first and then dabbed some orange into it using sponge. Let them dry and then cut out a piece of natural dried flower and glued it down with some PVA glue.

I let this dry for a few minutes, then inked it with clear embossing ink, and sprinkled generously with amazing glaze. I have used my tray as you can see:)
Step 2:

Heat set the amazing glaze using a heat gun. Do protect your work surfacec as the amazing glaze powder tends to scatter around.
Step 3:

Keep on heating until the powder melts.
Step 4:


It will look like this when the powder has melted.

Here are a few examples I have done using die cut flowers as well. I just love this technique as well!


 I have used Butterscotch and wild plum in this one. I just dropped droplets of the colours sparingly all across the glossy paper. Then dropped the blending solution here and there and they will start mixing. If you want them to look like dots, be sure to drop them in such a way that they remain as close to a circle as possible, and when you are dropping the blending solution, drop them carefully in the same way in the middle of the alcohol ink. And then, just leave it, it does the work for you!
 If you want to see which card I have made using this one as a background, come back on Monday night when I will post the Papercraftjunkies challenge!
 Here I have used Adirondack Alcohol ink in Stream and Butterscotch. The alcohol blending solution gave that spreading effect.But here instead of dropping them and let them drop in a tight circle shapes, I have dropped streaks of them, moving my hands, having at times , lines , zig zag lines ect....


