


Im surprised but happy to see more subscribers on my blog..Thanks and I am sorry I didn't welcome any new subscribers recentlyon my blog(this blog).If you have not subscribed yet, check out my right hand side bar link for subscription button, and all you need to do is click on it and just follow the quick and easy instructions...
Anyway, I have a few things lined up for you girls. I know I have not updated my blog a lot recently but I did warn you all that I am very busy at the moment. But I have realised I can also pre-scheduled some posts and thought , wow , this is fantastic..I can keep my blog alive even if I am away.So cool! I will work something out pretty soon, which means , even though you will see new posts, it doesn't mean I am posting it at that very time.So please forgive me if I do not get back to your comment or email straight away, but you all know eventually I will. Mostly, you can catch me on week ends. If you have some burning questions, email me and subject titled it 'urgent'.
Okay, here is a video tutorial I made couple of weeks ago...(sorry, never got round to upload). I hope you will enjoy it and rate , comment and susbcribe. I need your support to carry on making videos as I have explained before, this takes a lot of time and if I do not see many interests , then I will not make any more video tutorials but will keep blogging, of course.
So, this is my video tutorial and if you can double click to view it straight on youtube , that would be great.Take a minute, register with youtube, and susbcribe so you can be among the first to know when I am making new videos.Also, it will be an opportunity for you to support me by rating and subscribing...yesno?


I have used glossy card, Adirondack alcohol ink(Tim holtz), Distress ink(by Ranger), Stamp from Crafty individuals(www.craftyindividuals.co.uk), stamp from My Sentiment Exactly, Polka dots from Hero Arts, Ink and cardstock and embellishment and ribbon from stampin up. You will get to see step by step of how I have made this card by watching my youtube video tutorial but if you would like me to write it down, let me know:)
Bye for now and speak to you all very soon:)
Thanks for stopping by
Tassy
x
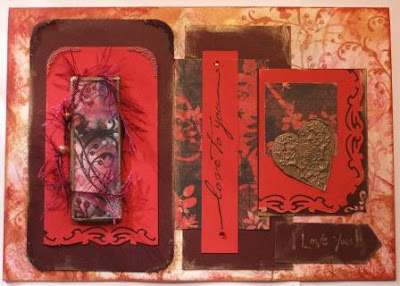
 I have used the Microscopic Slide Size Acetate:
 I absolutely like this part of the project, specially this lovely heart embellishemnt which I have made by pouring some melted UTEE onto the non stick crat sheet, then I stamped a heart simage, with intricate design, into the warm UTEE. I held on for a few seconds then remove my stamp to reveal this beautiful image. Stamp was a freebie from

 I was quite pleased with this project. I finished off with a Hero Art Stamp which read Love to you. The patterned paper is from Basic Grey and I wanted to do some matting and layering since the size of the card is quite big. Here you go, I hope this inspires you to try some 3D effect on your card.


