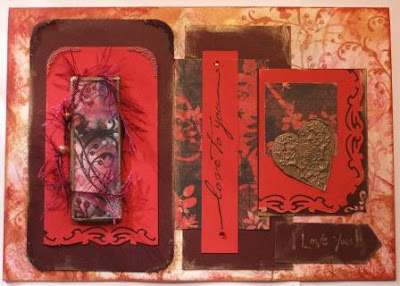
I have first of all folded an A4 size card in half. I have distressed the card with Distress Ink, tea dye and fired brik. I haven't really done distressing before so I didn't achieve what I really wanted to but hey, there is no specific rule about it anyway, so I thought it was alright. Then I have stamped some swirls images from Figgy pudding set(Basic Grey) and heart stamp from Crafty Individuals with versamark. I then chalked over with earthy colour chalks(browns and reds).
I really wanted to try out faux soldering demonstrated by Suze Weinberg in her Melt Art Made Easy DVD and by Tim Holtz in his An Altered Journey DVD. The minute I saw it I knew I would enjoy doing a project using this technique. So this is my first attempt at faux soldering and stamping into Ultra thick embossing enamel, platinum. Check out
Cre8tive online and
craftathome for fantastic offer on Melt Art. I was very lucky to get most of my products from the Marketplace on
UKscrappers.....It was a bargain I consider myself very lucky to have came across! And I did get a few other bits and pieces from the other above mentioned websites and the service was excellent.

I have used the Microscopic Slide Size Acetate:
Ephemera Acetate 1 from Crafty Individuals. These are ideal for the project I was doing.The Acetate comes with a white sheet of paper, so I cut the image I wanted to use, with the white sheet of paper. Then I have stamped some swirl images from the Figgy pudding set(Basic Grey). I over stamped lightly with the free stamp that comes with the craft stamper magazine.I have used black ink all along but because the acetate has some colours on them, when I laid it over the stamped images, you have this nice medley of images and colours. I then did the faux soldering using my thick platinum enamel which has melted in the melt pot. Fun, fun stuff!I wrapped some maroon fibre around it and stick it onto a red card which I have punched, rounded on top and straight border punch at the bottom.I matted and layered onto a maroon card. I have used some microbeads around the top edge to give some tactile effect to this part of the project.

I absolutely like this part of the project, specially this lovely heart embellishemnt which I have made by pouring some melted UTEE onto the non stick crat sheet, then I stamped a heart simage, with intricate design, into the warm UTEE. I held on for a few seconds then remove my stamp to reveal this beautiful image. Stamp was a freebie from
Crafty Individuals . This is such a cute little stamp which can be used for Valentine, Mother's Day, Friendship, Vintage...the list goes on.


I was quite pleased with this project. I finished off with a Hero Art Stamp which read Love to you. The patterned paper is from Basic Grey and I wanted to do some matting and layering since the size of the card is quite big. Here you go, I hope this inspires you to try some 3D effect on your card.


 If this doesn't work , click the link here :http://uk.youtube.com/watch?v=503so3bBkgA


