Sunday, May 25, 2008

Scrap-a-Paris

This is a project I made in February...I think I put off uploading them since there are so many pics to compress and crop and what not!!!I feel more tired uploading them than doing them. Actually it was a really cool project and my sister agreed to give me her pictures when she went on holiday to Paris with her husband. I saw that project on tvweekly and it was a project called 'pocket book' by Jami Patersen. She has used a card kit which I do not have. So I had to think about which papers to use, which stickers , and work out all the measurements again, to accomodate with what I have.

So, here are some patterned papers (DCWV christmas glitter stack), some images of Eiffel Tower on acetate which I bought from Craftyindividuals , Ki memories stickers and Three bugs in a rug (chit chat stickers)

This is my planning. I downloaded the step by step guide for the pocket book.You can do that on their website. Then I cut them out and pasted them in my sketch book as this is the easiest way for me to work out my measurements. I hate having to go back and forth on my PC when Im sitting down ready to work. Anything that distracts me will become a major distraction! This is who I am! So, on the next page , I have worked out that my photographs are much bigger than those she used, so my notecards will be A5( A4 folded in half). A4 size is 210mmx297mm and A5 is 148mmx210mm. Then my inserts will be 110x200mm or 11x21cm. My photos are at least 10x13cm~(4inchx5.2inch).This is the largest size I will crop my pictures.Basically, each notecard will be A5 size, then there will be an insert going inside it.

Once I have got all my measurements sorted, I now have to count my photos, then choose how many notecards, envelopes, vellum envelopes I will make. I have 55 photos!!!!
Each notecard will hold one photo or 2 on top and 1 on the insert.So I have 16 notecards, 16 envelopes and 5 vellum envelope.

Colours of notecards: Red, black and white vellum
Patterned papers: Red and black are my predominant colours
It might sound confusing but if you have a look at what Jami did then you will be able to understand the whole process much better.
Sorry for the poor quality of these pics, don't ask me why it happened!


These are all my papers cut to size...Notecards , inserts, vellum.

These are DCWV christmas patterned papers...They are so pretty and I had loads of them. So I thought why not use them since they fit the bill!These papers will be used to mat and layer my notecards and inserts.

I took all my A4 size paper and score them on my ultimate score board, using the half fold A4 line which will allow me to fold them exactly into half.
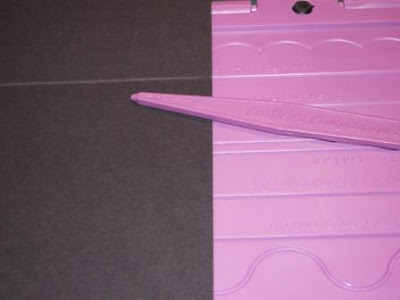
Then I used my vellum A4 sheet and score them along the first line which is normally used to crease a line for when you are making boxes.(the box base line).I scored along the right , left and bottom;so three scored lines.

Then I've creased them with my bone folder, and cut out the square piece at the corners. See below and yes I know my cutting board needs a scrub but you know wot, I like it like this....I am an old fashioned girl!


I am not sure you can see this properly, but I have cut out a semi circle in the middle of the top end side of the vellum. Then I have glued it onto a card to make it into an envelope. I have given the sizes above.

To make the notecard, after I scored down the middle half line on the card, I've applied some glue on the edge of the card to form an L shape, in reverse and then I glued down the two sides of the card together. The top part is open which turns it into a pocket where the insert will go later.


Then I've stamped some swirl images with clear embossing ink, covered it with some black glittery powder and heat embossed it.

See....?

This is the front of my first note card.

Okay, now, if you look carefully, you will see, I have glued down a piece of patterned paper on the right hand side which will cover about three quarter of the front side of the notecard. Then I cut out my photograph, and stick this down on the patterned paper, add a cute sticker and the word paris has been printed off the computer and chalked with red.

Then next is the vellum envelope. I used a sheet of dotty card as the base and stuck down my acetate image, then the photograph and inserted it in the vellum envelope.


This is a closer view...and yeah, by the way, this is my sister:)


Then I kept on decorating as I wished and just let my idea lead the way really.... I used stickers as tabs..


This is what I meant by inserts!


As you can see, you can also, put it up on display...quite nice isn't!

Oh I forgot to say, that before sticking things down, I punched some holes on the left side and used some key rings to secure them together.

I hope you like it and you will have a go! It's a nice way of creating a keepsake of your trips, or an event. If you do one, please put a link in the comment section. It will be nice to see what you have come up with.

Bye for now,

Take care

x.x.x

Hello there!

I'm finally back and as you can see, fully recovered, I have been busy too!:)I have one week break before I to back to work, which is such a blessing! I have been so tired recently that Friday evening, when I came home from the trip, I didn't want to talk or do anything. All I wanted to do was lie down and stare at the ceiling! I have managed to reach a personal target that Friday and since I knew I am on holiday, I wanted to stay still and hoped time will stop, everything will come to a standstill. So I could just be, and let the emptiness and silence around me be.

Regarding the new look on my blog, believe me when I say, it takes ages to work on the html and change the header picture, resize it, add some background images....I have been wanting to do this since ages, and couldn't manage to do it, I read again and again about 'how to' on the dashboard but to no avail. Then I came across this link on Stamping Mathilda's blog HERE, and I knew I could do this! Her blog is amazing, her works are just breathtaking...I couldn't help from not reading each and every single thing on her blog, a true inspiration. If you haven't visited her yet, then I reckon you do it right now..it's worth it.

Anyway, her instructions are really clear. But if you are not familiar with html, then it seems a bit hard and if you forget a simple thing like this: {;}, everything goes wrong!!But I took the chance and I followed her instructions and I had a few hiccups because I think it depends which template you are using. So if you have any queries, do not hesitate to contact me and I will try to help the best I can.

Now, I will upload a project I made ages ago, that was I think back in February!Then I have two more cards to show you...Will do so in a minute as I'm off to do something right now!

See you in a min!
x.x.x

Monday, May 19, 2008

Feeling poorly:(

Hello there!

This is just to let you all know I will not be posting anything anytime soon...I am so sorry about that.I am not feeling too good. I have already got a few emails asking me where I am....and guess what, there is nothing that makes me happier to know that I am being missed! I know I haven't done many things lately and I do intend to catch up pretty soon. But unfortunately, right now, I need to rest....I have been through so much over the past months that I wonder what is in store for me next! 'sign'...On a lighter note, I am breaking up from school this Friday, which means I will be on holidays soon.If I have sorted meself by that time, then I am pretty sure I will be able to post some cute stuffs soon.

But by all means, do come back on the 2nd of June 2008, and check on the link I will give you so you can access the FREE PaperCraft Junkies Emag which will have more exciting projects and ideas which you can download and print. And it is FREE.You will love it.

Also, do check under my profile to see the two new blogs I have added. They are under construction but I will be working on them as and when I can.

Okay, that's enough from me for tonight.

Bye for now and take care....

Come back and visit soon.

x.x.x

Thursday, May 15, 2008

Altered coaster -Quick and Easy project

Hi there, it's me again! I have made this project a few weeks ago and I have finally managed to show them. I found this project on Chicn Scratch video on youtube. She calls it post-it note holder and she has been my source of inspiration. Visit her videos for more ideas as she is really creative and her videos are just fantastic.

Okay, first of all , you will need some designer papers of your choice, modpodge(as I found them to be the best for this project) but you can use PVA or double sided tape if you prefer, corner rounder punch and paper clip.

Put your coaster on your designer paper and trace around it twice. Decide if you want to use the same pattern on both sides or not. Next, smear generously some mod podge with a paintbrush.

Then stick down your patterned paper smoothing them out and wiping off any glue oozing out at the sides with a tissue.
Then sand the edges with a sanding block, but when you do so, make sure you sand in one direction, in a downward movement. Do not rock back and forth as this will have a tendency to remove the paper or even tear it. Sanding down will give it the desired smooth finish and will almost blend the paper layer with the coaster together.


Then, stick down patterned paper on your paper clip.

Take a post it note and seperate them , maybe in three's. Then take one of them and stick it onto the coaster and hold with paper clip.


This makes a cute little personalised gift....I like pretty things so if I have this on my desk at work, then I will be writing many many notes...I need to remember stuffs , you know!

I hope you like it.....If you do this project , do not hesitate to put a link in the comment section so we all can have a look. I would love to!
Bye for now,
Take care
x.x.x

Saturday, April 26, 2008

Kitchen Sink Stamps

This is a project I have made a few weeks ago but I didn't get the chance to upload them simply because I was dealing with too many things at once and really didn't have the energy to do so......And now I thought I would catch up on things that have been lying on my shelf for too long, far too long!

I have used the 3 Steps -Hearts and Roses from Kitchen Sink Stamps. I found these stamps very different and this is what really attracted me to them. And they were really fun to use. It gives you the push to think outside the box and play with colours and tones. It is called 3 steps for the very reason that you will achieve the final stamped imagine in three steps. Gosh, I should have taken a photograph of what I mean. Well, I had lots of fun using them and I think they are so versatile that you can do so many projects with them. The acrylic stamps are really strong and they give nice clear print. I love them!

I made this project specially for Suzanne (LiquidIllusion) who has been a great support for me in my time of 'don't-talk-to-me-I-dunno-what-I'm-doing!'. She has constantly been in touch, letting me know she is thinking of me, asking me when I am posting new things as she finds my work inspiring.....These words meant a lot for me. So I wanted to thank her and show her how much I appreciate her friendship. The only reason I couldn't send this over to her was because (well its a long story but hopefully I will manage to send them soon). So for now, I will share with you what I have made with Kitchen sink stamps and also, what Suzanne will be receiving from me!:) Thank you Suzanne and hugs to you!

I was also experimenting with taking shots during the day and since the sun was shining I thought I would include them in my pics....Im just playing around to find different ways of presenting a project....sorry about that!


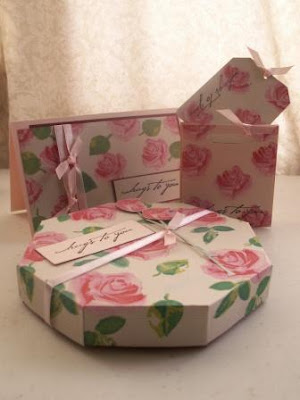
This is a complete gift set with the box, gift tag, small bag and card.


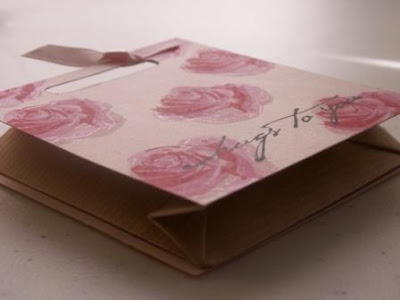
I have made this small bag with an envelope. I have made the envelope using craft brown paper using an enveloper score board...then I made this bag-a-lope following instructions on youtube from a stampin'up demo...Im sorry I cannot remember the link now but if you are interested , let me know or I will put a link later....If I remember:)
And of course I have stamped the roses on a piece of pink card and attached them to the front of the bag, front and back actually.


Looks like the season of pink and brown to me as this is what I seem to be doing right now, pink and brown!!!!I have stamped the roses and leaves onto pink card, mounted onto brown card then onto pink again.The card itself is pink here. Finished off with pink ribbons and hugs to you sentiments from Hero Arts.

I have made this box using the Eazi Score board where you can make a hexagonal box within minutes.


Look, even I do not like fussy bits and pieces with glue, I have managed to do the edges and corners quite neatly. So trust me when I say , this is not hard at all!
If I am doing something, my obsession of having it perfect overtake my mind. And sometimes, instead of having fun, I am too stress about having a perfect finish project. But I can say that with this one, I didn't have to try too hard. The score board allows you to be more relaxed, you only have to do the cutting and sticking the edges together. Lotsa fun!
I hope you like it! and most of all, Suzanne, hope you like it!

Friday, April 25, 2008

Flourishes LLC

Here is another card I made using the heart stamp from the Heart set from FlourishesLLC. I have again used pink and brown card.I have stamped the heart onto pink card using versafine black ink.I was well impressed with this versafine ink as the lace heart stamp has very fine, delicate swirl designs and I think the versafine works best for this stamp.I have then cut out part of the images on the right hand side of the stamped image with my cutting knife. then I have mounted a brown card under the cut out part of the heart. I mounted the finished heart onto a piece of pink square as seen below.I thought if I tilted the heart in this way, it will create some interest....but I am not that sure anymore:)Anyway, its done now, so I gotta do wot I gotta do, right!That is to post it:)I have also stamped the heart on a pink card using pink ink and I have glued it to the right hand side of the card.I finished off with some *bling*..(sticky studs)..It seems like I cannot get enough of these blings...I hope you like it!!
For those who lives in the UK, I must say, I received my order from Flourishes LLC in a weeks' time, there is no extra fees to pay when I got them. Deal or wot?:))

Wednesday, April 23, 2008

FREE E-MAG

Just a reminder that Papercraft Junkies has now a Free Emag accessible to anyone, everyone!!!Its packed full of ideas, projects and many more....Don't believe me? Okay, here is the link, it is a must for you to check this out, and I mean , right now!Don't delay as once you see this you would ask yourself why you didn't see it before as it's completely free...:)

Free Emag

Enjoy!:)

First project- Flourishes LLC

I have used the Damask set to do the watermark background on the chocolate brown card.I decided to use pink and brown for a change and I think I quite like this coulour combination. The scalloped edge was made using a corner punch and that worked quite well as I wasn't sure I could do it. I like the saying that comes with the Lace Heart set about love , so I have used it as the main message. I finished off with some bling- I mean sticky studs and some ribbons....


I have stamped on the ribbon using the Damask stamp and a cream colour ink.I had to wait for it to dry before using it as my fingers were all messy when I was fiddling with the ribbon not realising it wasnt dried yet. Use a quick drying ink at all cost.Here is another pic of the ribbon..


Flourishes llc

This is how Flourishesllc sent this order over to me....I think it was really cute:)


Tuesday, April 08, 2008

Papercraft Junkies Emag

Hi everyone! I would like to share what I have been wanting to since a while now. Remember I told you about Papercraft Junkies secret? Its ready to be downloaded now!
Its a FREE Emag , bursting with ideas and resources.
Here is it: http://www.papercraftjunkies.com/eMag/PCJ-1.pdf
Hope you enjoy it!

Visit Papercraft Junkies for more ideas, Gallery, tutorials and lots more.

Take care
X

Monday, April 07, 2008

Where has it gone?

I've lost my creativity....:(

I would like to apologise for not blogging these days.Again thanks a lot for everyone who emailed to see if I am okay and when I will be posting new stuffs. Well, I am okay , thank you.There has been a lot going in my life, yet again! Last Friday was the last in my now, previous job. It was a very strange day , lots of emotions , mixed feelings and I existed, but I felt like I was rather part of the furniture than living the day.Anyway, its complicated so let's move on.

I have two weeks Easter break from work. And someone from Canada asked me how weird is that, that we have our Easter break when Easter is well done and over with.This is funny as even at work people were saying, this is not Easter break, its half term. Whatever it is, I do not mind the break!I need this a lot right now.

I have done a few projects over the last week or so but didn't manage to upload them...Why? I do not know. I have the time, I have my memory card(no it's not lost)...you know when you have a lot of things on your mind and you cannot think properly? Well that's me right now.But this blogging thing, doing art and craft, is indeed an outlet for me when I am happy, but also an escape when I feel like I need a break from the reality of this world. But I am sure you will understand when I say 'creative blockage'. No matter how hard I try to create, I can't. Its frustrating because I have everything I need but I cannot put them together. But I believe I need to get started even if I have to throw a few projects away, at least I am starting on something, then hopefully from there, the rest will follow.

Okay I didn't mean to bore you with my lack of creativity so, I will upload a few projects later. I might also add a link to the launch of the Free Emag I told you about.

It snowed in London yesterday and it was bright sunshine as well. Isn't this weird?

See ya later.